
Hi! In the last post, we deployed a simple LLM endpoint using the Titan Takeoff server using an AWS EC2 instance. We compared performance between a GPU enabled instance and a CPU only instance, and between the Takeoff server, and raw huggingface/pytorch. In this post, we'll look at another cloud provider, and try out their tooling for deploying LLM endpoints. We'll use the same Takeoff server, but this time we'll deploy it using Google Cloud, specifically, their Google Cloud Run service . On the way, we'll discuss a little bit about serverless, and how the Takeoff server means that we can use serverless tools to deploy LLM endpoints.
Outline
- Introduction
- What is serverless?
- Cloud Run
- The TitanML Takeoff server
- Deploying the Takeoff server with Cloud Run
- Step 1: Set up a GCP account, and create a project
- Step 2: Deploying the Takeoff server with Cloud Run
- Step 3: Interacting with your model
- Step 4: Deploying a new version
- Conclusions
Introduction
In this section we'll give a bit of an introduction to the tools we'll be using in this tutorial.
Google Cloud Platform
GCP (Google Cloud Platform) is Google's cloud offering. They have a wide range of services: spanning compute, storage, container orchestration, ML/AI, and more. We'll be using their Cloud Run service, which is a serverless container service.
What is serverless?
Serverless is a term that's been thrown around a lot in the last few years. It's a bit of a misnomer, as there are still servers involved, but the promise of the idea is that you don't have to manage them. Instead, you package up your code somehow, send it to a cloud provider, give them some details about how you want it to run, and they take care of the rest.
Cloud Run
Cloud Run is one of Google's serverless offerings. It's a container service, which means that your code goes into a container1.
A container is a way of packaging up your code and its dependencies. It's a bit like a virtual machine, but it's a lot more lightweight. You don't need to know anything about containers to run this tutorial, but if you're interested, you can read more here.
Happily, the Takeoff server is already packaged into a container. This means that deploying the Takeoff server on cloud run is as simple as telling cloud run where to find the container, and how to run it.
The TitanML Takeoff server
The Takeoff server is an offering from TitanML that makes it easy to deploy optimized Large Language Models.
It comes in two parts, the iris client, that can be used to launch and manage your servers, and the fabulinus server container, which performs the optimization and model serving.
The iris client is useful for managing your container on your local machine, but it's not necessary for deploying to the cloud.
In this we'll, we'll be using the fabulinus container directly.
Deploying the Takeoff server with Cloud Run
Step 1: Set up a GCP account, and create a project
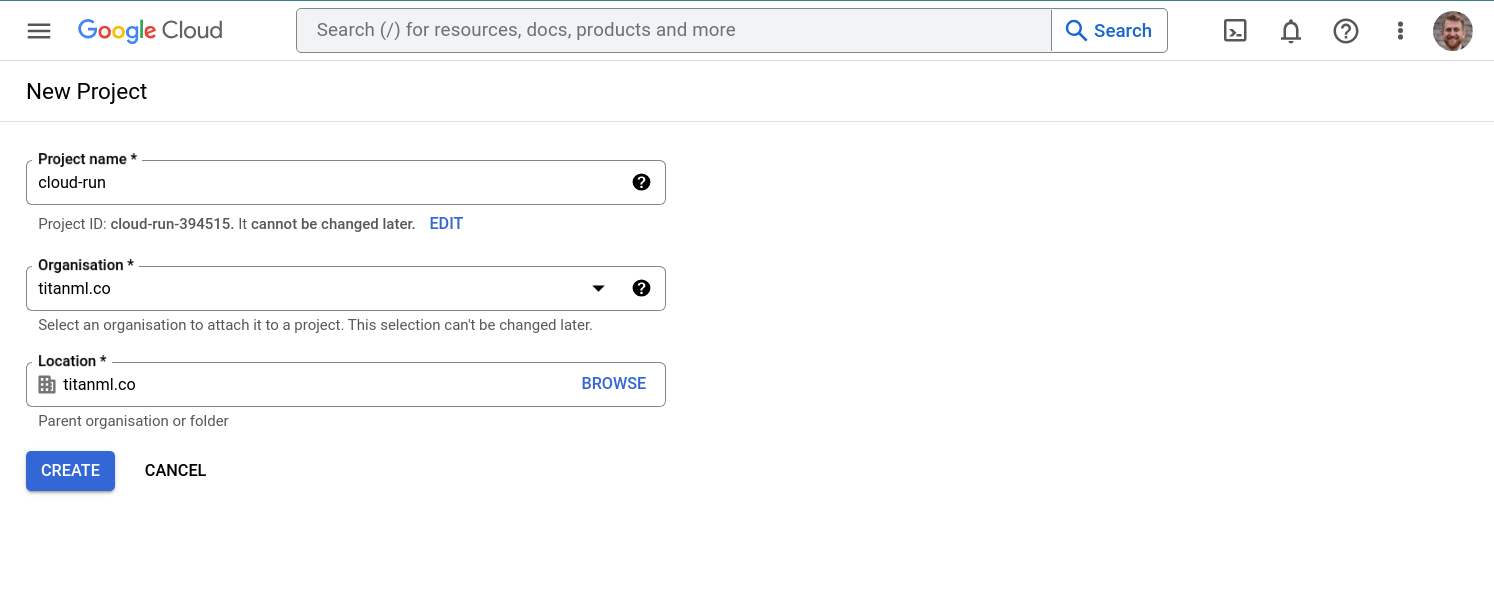
The first step (if you haven't already) is to set up a GCP account. To do so, follow the getting started instructions here follow the instructions here. Once you've signed into your new Google Cloud account, you'll need to create a project. To do so, click on the project dropdown in the top left of the screen

Then, click on "New Project", give your project a name, and click "Create". We'll call our project cloud-run2
Once your project is created, you'll be taken to the project dashboard.
Step 2: Deploying the Takeoff server with Cloud Run
Type "Cloud Run" in the search box, and navigate to the cloud run dashboard.
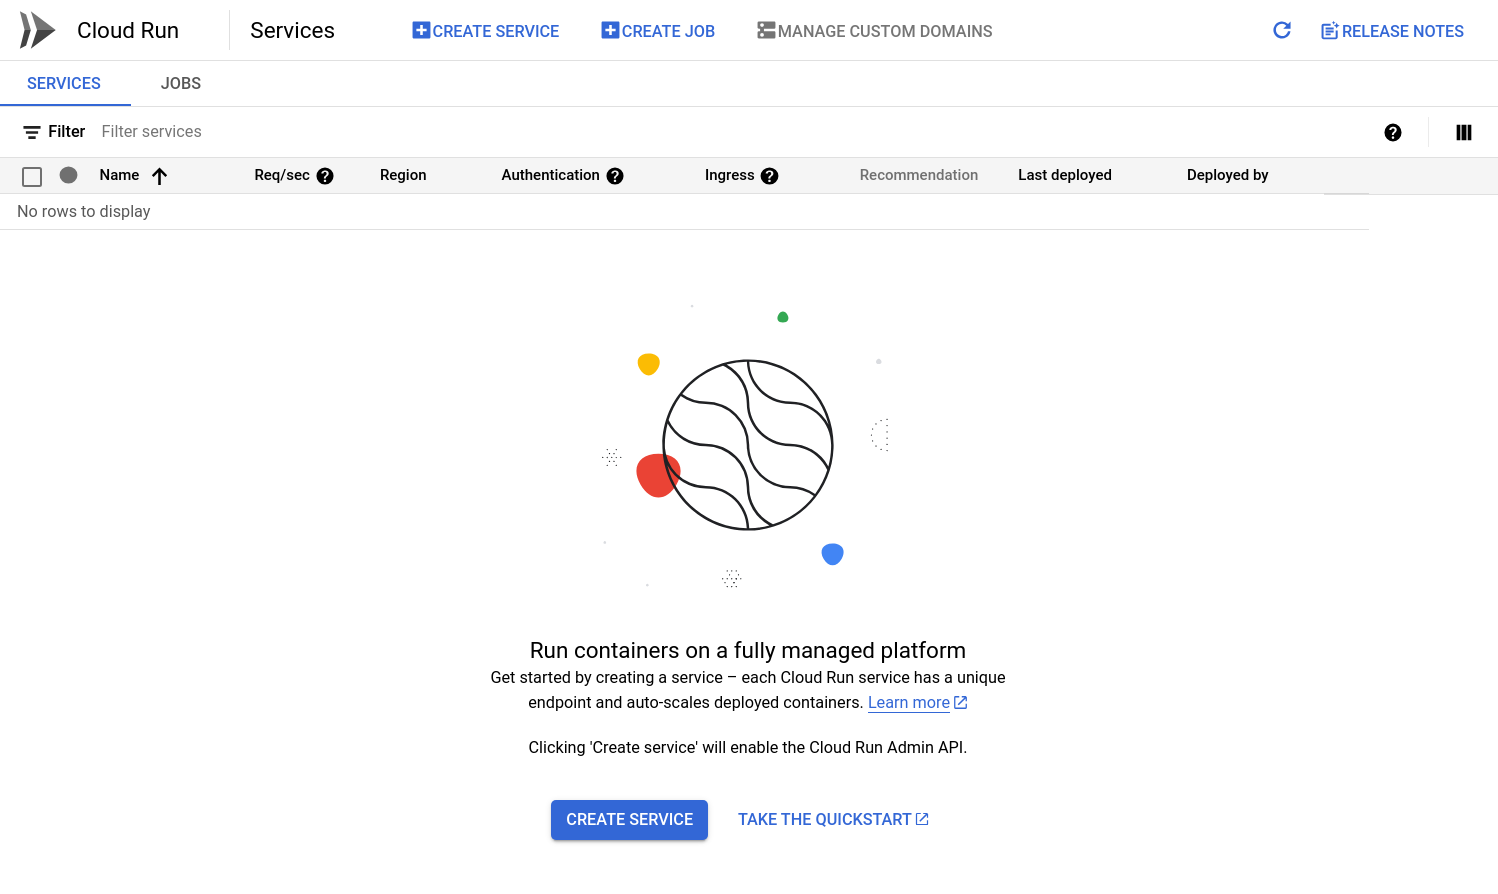
From here, click "Create Service". This will guide you through the steps of creating a new cloud run service. Fill in the following settings for your service:
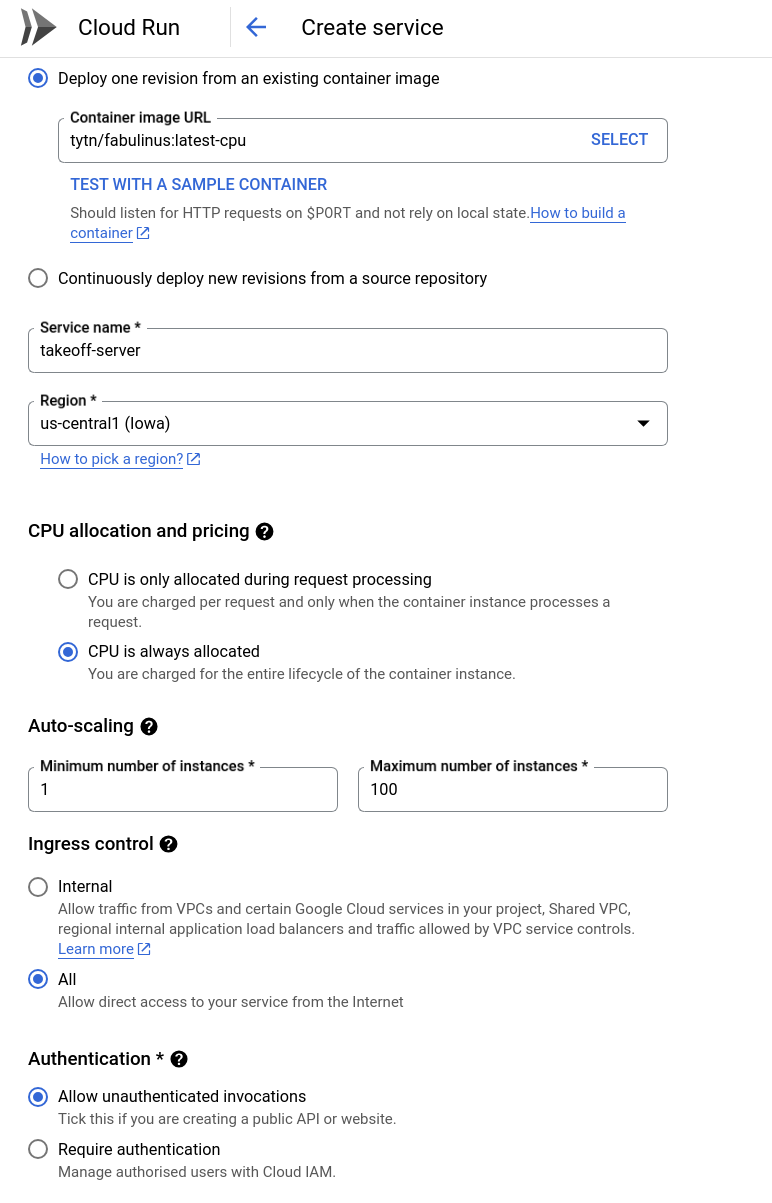
- Container image URL:
tytn/fabulinus:latest-cpuThe Takeoff server is available as a docker image on dockerhub3. - Service name: We'll call our service
Takeoff-server. Feel free to choose a different name. - Region: We'll choose
us-central1as our region. - Minimum number of instances: We'll choose 1, since we want to be able to query our server as soon as possible.
Feel free to choose a different region if you'd like. Because the Takeoff server has a cold start time, and we'd like to query it ASAP, we're choosing a minimum number of instances. We're also choosing to allow unauthenticated invocations, so that we can query our server without having to set up authentication.
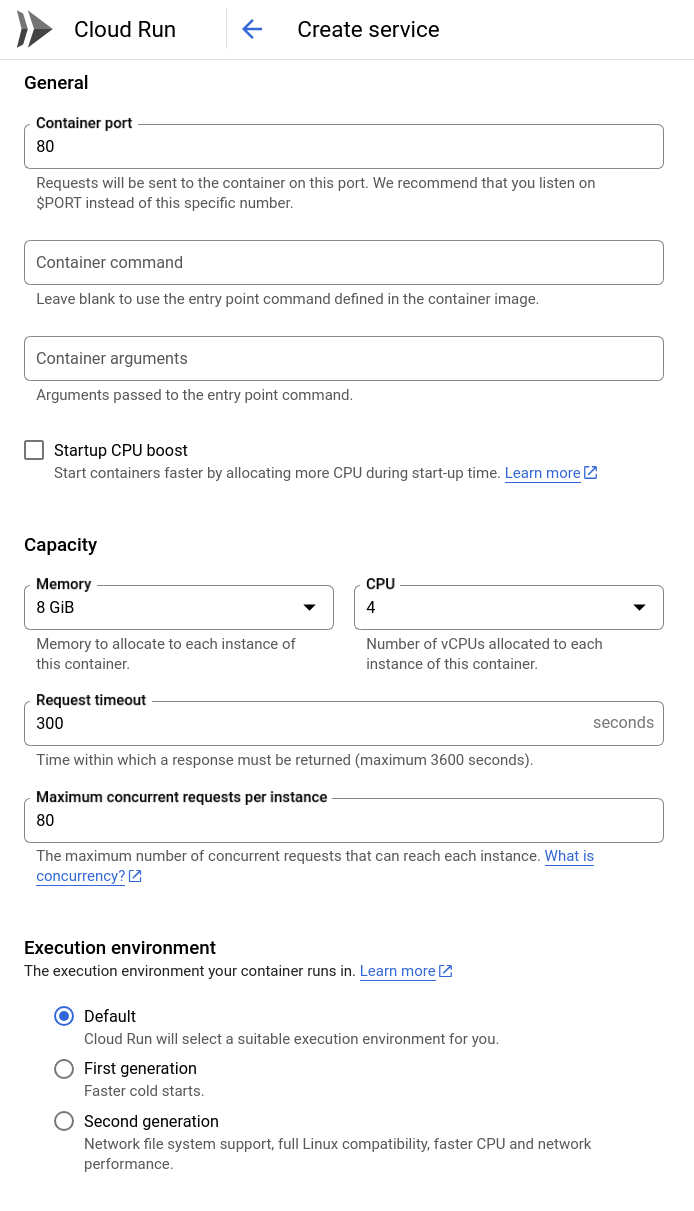
Now, click the "Containers, networking, Security" dropdown. We need to set a few settings to make sure that the Takeoff server can run properly.
- Container port:
80This is the port that the Takeoff server listens to by default. - Capacity: Memory:
8 GB, CPU:4 CPU. These numbers will affect how much memory and CPU your server has access to. These numbers can probably be smaller for the models we're using, but let's stay on the safe side4.
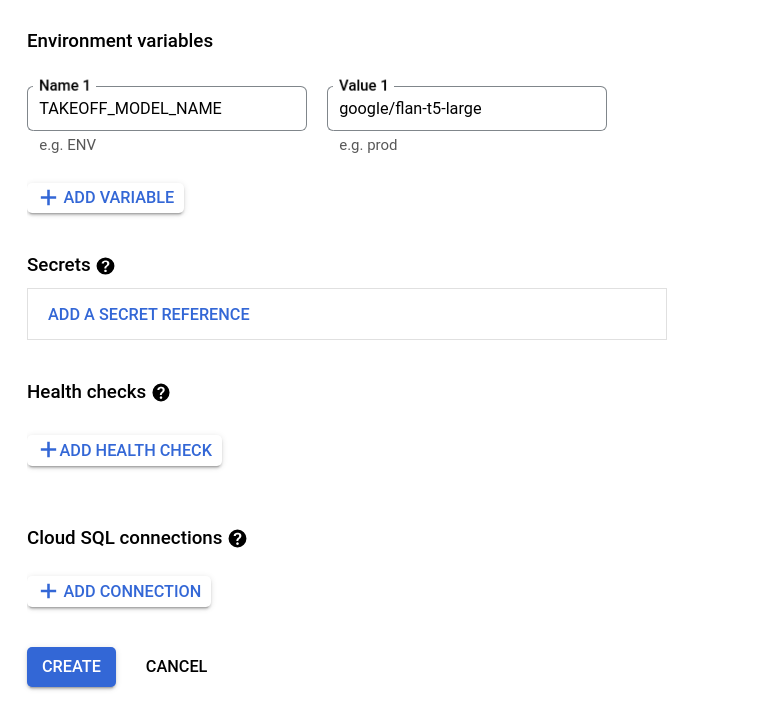
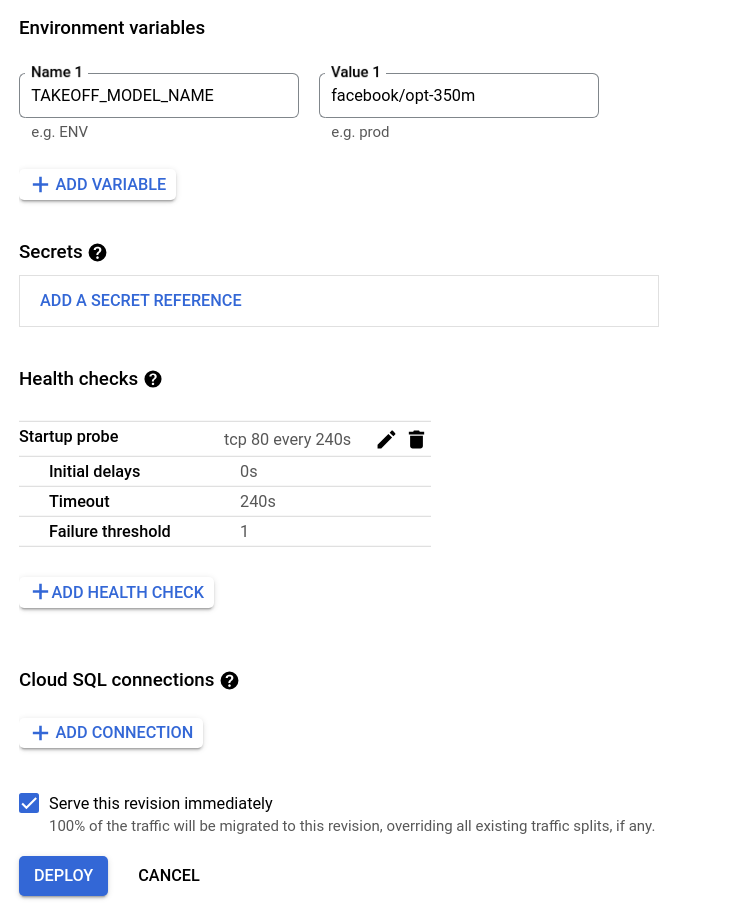
Next, we need to set the environment variables for our container.
The only relevant environment variable for the Takeoff server is TAKEOFF_MODEL_NAME.
This gives the huggingface name of the model you want to deploy.
We're using the google/flan-t5-large model, which is an encoder-decoder model finetuned for instruction following, with 780m parameters.
Serverless deployments of ML models are usually more suited to smaller models, and while we haven't got GPT4 running here, you'll see that the Takeoff server does enable us to run pretty large models serverlessly. It's even possible to run still larger models, but remember that models with more parameters will take longer to download, and so you should increase the Request timeout accordingly.
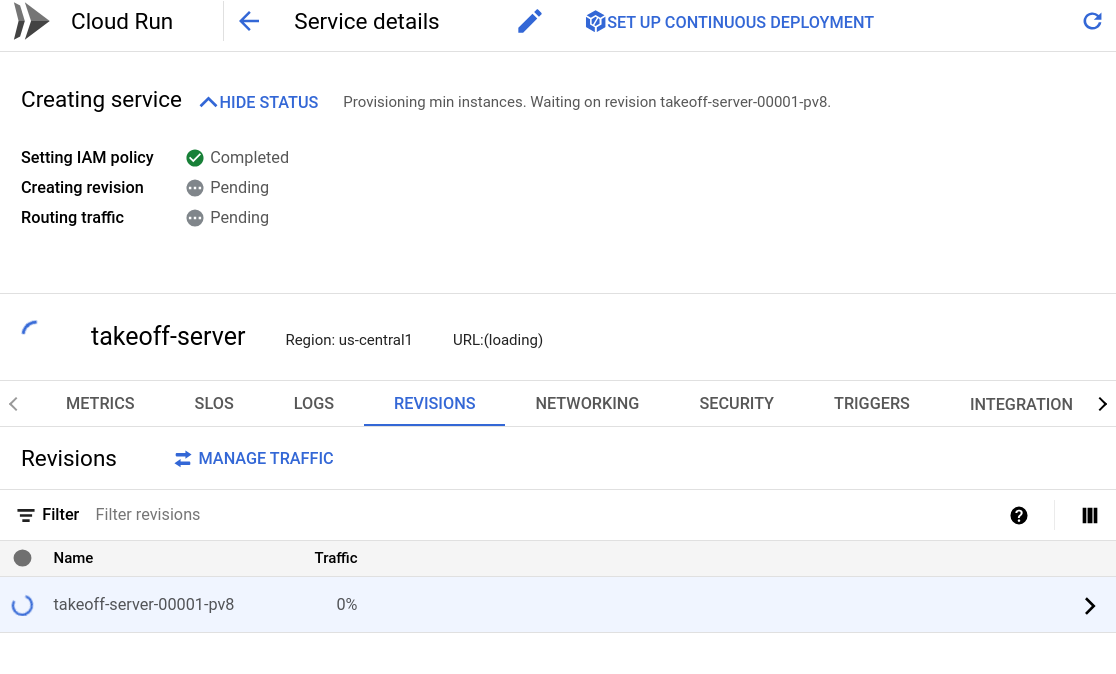
Now we're ready to go! Click the create button to deploy your endpoint. You should see something like the following, as your model begins to download, and the deployment starts. The logs tab will contain the streaming logs from the Takeoff container. The server will begin the download and optimization of the large model. If you chose a smaller model, this will be faster, if you chose a larger model, you may see a warning that the request timed out, or that the memory limit was exceeded. If this happens, you should increase either the memory limits, or the request timeout.
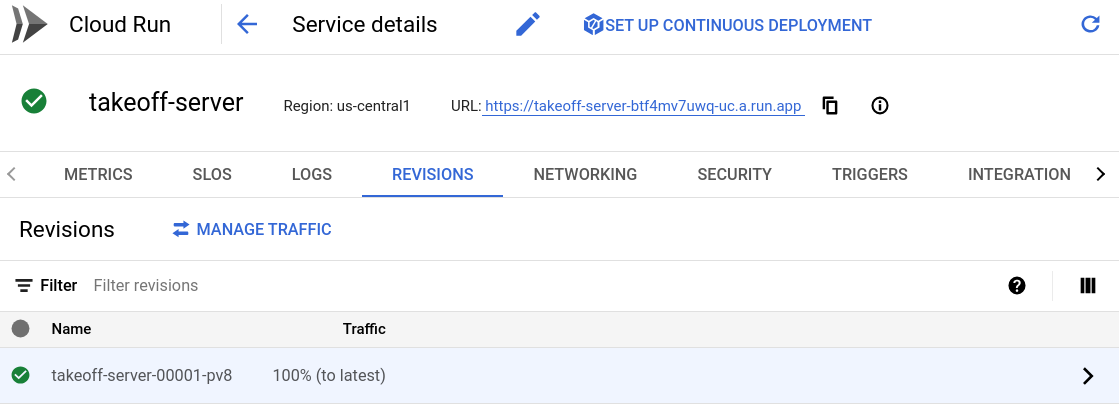
After a couple of minutes, the deployment should complete, and you should see something like the following:
Step 3: Interacting with your model
Once your deployment is complete, you should see a service URL on which your service has been deployed.
This public URL is where we can access and interact with the model.
To see the API documentation, navigate to {service_url}/docs, for me, that's https://Takeoff-server-btf4mv7uwq-uc.a.run.app/docs.
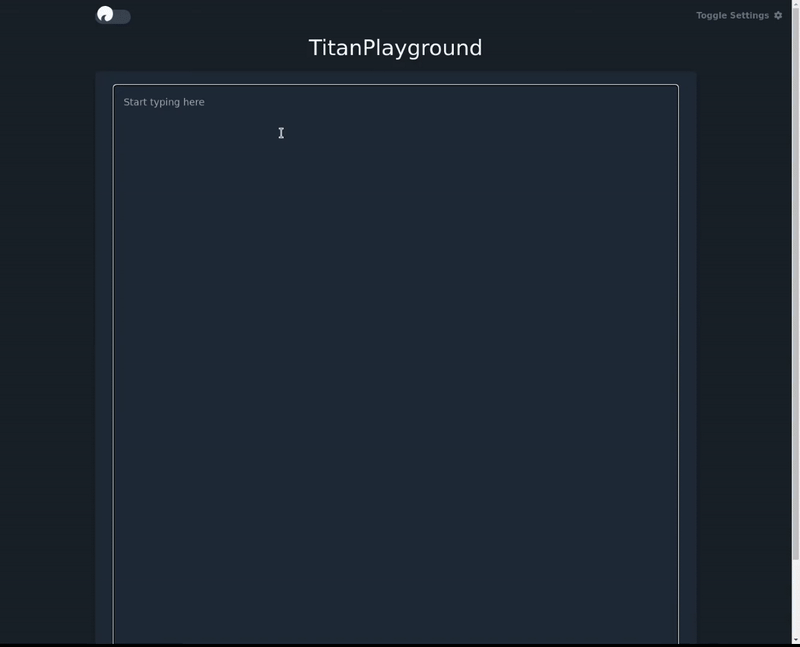
For rapid experimentation, try out our bundled, easy-to-use interfaces.
For the playground, navigate to {service_url}/demos/playground - for example, for me, that's https://Takeoff-server-btf4mv7uwq-uc.a.run.app/demos/playground5
In the playground, the enter key tells the model to complete what you've written.
The flan-t5 model we've used is tuned for instruction following, so ask it to answer your question!
Step 4: Deploying a new version
We've deployed the Takeoff server, but what if we don't like the model we've deployed?
No problem, we can just put up a new version of the model.
Google Cloud Run & Takeoff makes it easy to deploy new versions of your container.
Click on the "Edit and Deploy New Revision" button to deploy a new version of your model.
Don't change the structure of the container, just scroll down to the environment variables, and change the TAKEOFF_MODEL_NAME variable to the name of the model you want to deploy.
Instead of the t5 model, we'll try one of the OPT models from facebook.
The OPT model family is a set of open source large language models from facebook. For some insight into what it takes to train a large language model from scratch, have a look at their logbook!
Then, click "Deploy".
Conclusions
In this post, we've looked at how to deploy the Takeoff server on GCP. The Takeoff server means that we can take advantage of the power of large language models without having to worry about provisioning expensive GPU infrastructure. We've taken advantage of this power to deploy to Google Cloud Run, a serverless container service. We've looked at how to deploy a model, and how Google Cloud Run and Takeoff make it easy to spin up new versions of your model.
If you have any questions, comments, or feedback on the Titan Takeoff server, please reach out to us on our discord here. For help with LLM deployment in general, or to signup for the pro version of the Titan Takeoff Inference Server, with features like automatic batching, multi-gpu inference, monitoring, authorization, and more, please reach out at hello@titanml.co.
Footnotes
-
If you've worked with kubernetes (and knative) before, cloud run will seem suspiciously familiar. ↩
-
This is a terrible name for a project ↩
-
Fabulinus is the name for the server component of the Takeoff server, and iris the name for the launcher. It's available in two versions, one for CPU only machines, and one for GPU enabled machines. The GPU enabled images will work on CPU only machines, but they're significantly larger, which means serverless deployments won't work properly unless carefully configured. Also, the serverless offerings from the major cloud providers don't yet support GPUs. For an interesting serverless GPU offering, checkout modal labs. ↩
-
The number of CPUs mostly impacts the inference speed. The memory requirements affect whether the container can boot up and perform the optimization process. The optimization process requires more memory than model serving. We've tried to cache the most popular optimized models, so that the optimization process doesn't need to be run on every container bootup. Let us know if you encounter issues with memory usage on the discord here. For rules of thumb, see here. ↩
-
Note, this url might not be active at the time you read this blog post. ↩