Vertex
Deploying the Takeoff server on Vertex AI
Vertex AI is Google Cloud's unified AI platform that provides purpose-built MLOps tools for data scientists and ML engineers to automate, standardize, and manage ML projects. Vertex AI can be useful for anyone looking to build and deploy machine learning models quickly and efficiently, without having to worry about the underlying infrastructure and management of the machine learning pipeline.
Takeoff makes it easy to deploy large language models. Vertex and Takeoff are perfect partners - with Takeoff it is trivial to launch a language model on a single device, and with Vertex it is easy to scale that deployment to many instances dynamically.
When running on Vertex Takeoff doesn't support streaming. Only the /generate endpoint will work. The Vertex AI instance also cannot communicate with the Titan frontends.
Prerequisites
To follow along with this guide, you will need these few things set up:
-
Artifact Registry should be set up so you can push the Takeoff Image to this location. Check out this guide for help setting this up.
-
Vertex AI should be set up so you can access the Model Registry, as well as create new endpoints.
Step 1: Downloading the Takeoff Server
To get started we are going to download the Takeoff server. Assuming you have already arranged access to the Takeoff docker container we can download the image:
docker pull tytn/takeoff-pro:0.10.2
Step 2: Upload Takeoff to Artifact Registry
Now we need to tag the image so that it can be uploaded to the Artifact Registry. The command below will do that. Make sure you fill in the command with your own account id and region!
docker tag tytn/takeoff-pro:0.10.2 <location>-docker.pkg.dev/<project-id>/<repository>/tytn/takeoff-pro:0.10.2
Now we can push the container to the Artifact Registry:
docker push <location>-docker.pkg.dev/<project-id>/<repository>/tytn/takeoff-pro:0.10.2
Step 3: Create a Model in the Model Registry
For the next few steps, you can either do them through the Vertex AI User Interface or the Python SDK. If you are doing this for the first time, it might be a good idea to use the Vertex AI User Interface as you will be given options and guided along.
Vertex GUI
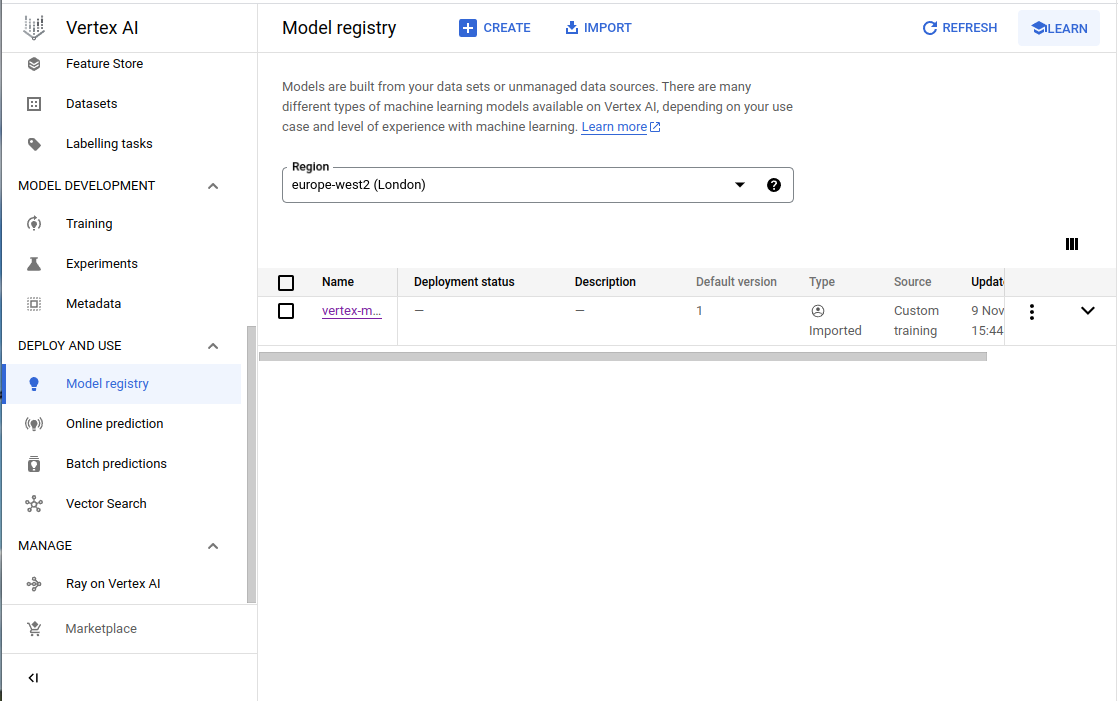
On the left sidebar of the Vertex AI application, click on Model Registry. Then click on import near the top left side, which will bring up a sidebar to the right. Specify the desired name of the model and then click continue.
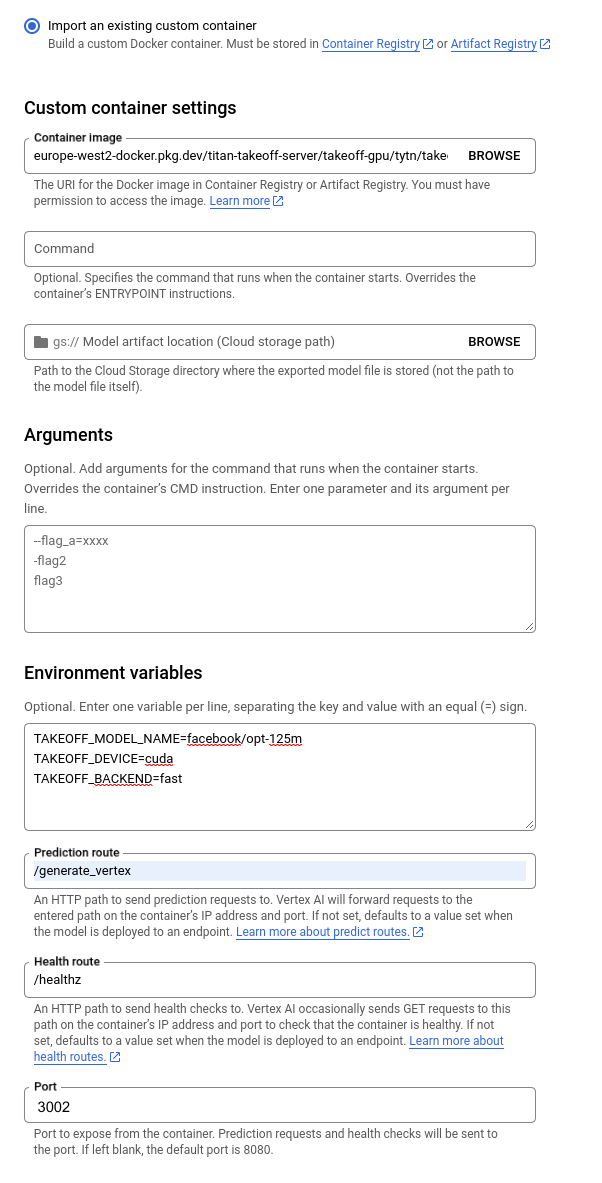
On the next page, select Import an existing custom container, selecting your desired model.
Set the Environment Variables:
TAKEOFF_MODEL_NAME=facebook/opt-125m
TAKEOFF_DEVICE=cuda
Set the Prediction Route to /generate_vertex
Set the Health Route to /healthz
Set the Port to 3002 which by default is where the /healthz and /generate_vertex endpoints live. If you wish to change this add TAKEOFF_VERTEX_PORT=<port_number> to the environment variable and then you can select a different port here.
Click through to IMPORT, ignoring the options regarding Explainability.
Python SDK
Open up a python file model.py.
We are going to use the Vertex AI SDK, so make sure that is installed using:
pip install google-cloud-aiplatform
We will need to create a model instance in the model registry, by specifying configuration variables that tell the Takeoff container which models to use, and what device to put it on. You can also include additional variables from the documentation as well. Remember to to import the Vertex AI SDK as well.
from google.cloud import aiplatform

# EDIT THESE VARIABLES TO MATCH YOUR PROJECT
VERTEX_MODEL_NAME = "takeoff-model"
SERVING_CONTAINER_IMAGE_URI = "image-uri"
PROJECT = "titan-takeoff-server"
LOCATION = "europe-west2"

TAKEOFF_MODEL_NAME = "TitanML/llama2-7B-chat-4bit-AWQ"
TAKEOFF_DEVICE = "cuda"

# Define the upload model function
def upload_model_sample(
    project: str,
    location: str,
    display_name: str,
    serving_container_image_uri: str,
    artifact_uri: Optional[str] = None,
    serving_container_predict_route: Optional[str] = None, # inference route
    serving_container_health_route: Optional[str] = None, # health status route
    description: Optional[str] = None,
    serving_container_command: Optional[Sequence[str]] = None,
    serving_container_args: Optional[Sequence[str]] = None,
    serving_container_environment_variables: Optional[Dict[str, str]] = None,
    serving_container_ports: Optional[Sequence[int]] = None,
    instance_schema_uri: Optional[str] = None,
    parameters_schema_uri: Optional[str] = None,
    prediction_schema_uri: Optional[str] = None,
    sync: bool = True,
):

    aiplatform.init(project=project, location=location)

    model = aiplatform.Model.upload(
        display_name=display_name,
        artifact_uri=artifact_uri,
        serving_container_image_uri=serving_container_image_uri,
        serving_container_predict_route=serving_container_predict_route,
        serving_container_health_route=serving_container_health_route,
        instance_schema_uri=instance_schema_uri,
        parameters_schema_uri=parameters_schema_uri,
        prediction_schema_uri=prediction_schema_uri,
        description=description,
        serving_container_command=serving_container_command,
        serving_container_args=serving_container_args,
        serving_container_environment_variables=serving_container_environment_variables,
        serving_container_ports=serving_container_ports,
        sync=sync,
    )

    model.wait()

    print(model.display_name)
    print(model.resource_name)
    return model

# Call the model upload function
upload_model_sample(
    project=PROJECT,
    location=LOCATION,
    display_name=VERTEX_MODEL_NAME,
    serving_container_image_uri= SERVING_CONTAINER_IMAGE_URI,
    serving_container_environment_variables={
        "TAKEOFF_MODEL_NAME": TAKEOFF_MODEL_NAME,
        "TAKEOFF_DEVICE": TAKEOFF_DEVICE,
        # "TAKEOFF_VERTEX_PORT": TAKEOFF_VERTEX_PORT add if you do not want to use default 3002 port.
    },
    serving_container_health_route="/healthz",
    serving_container_predict_route="/generate_vertex",
    serving_container_ports=[3002], # Or TAKEOFF_VERTEX_PORT if you chose to set it.
)
Run this command to create the model.
python model.py
You will need to save the model ID for the next step.
Step 4: Create Endpoint
Vertex GUI
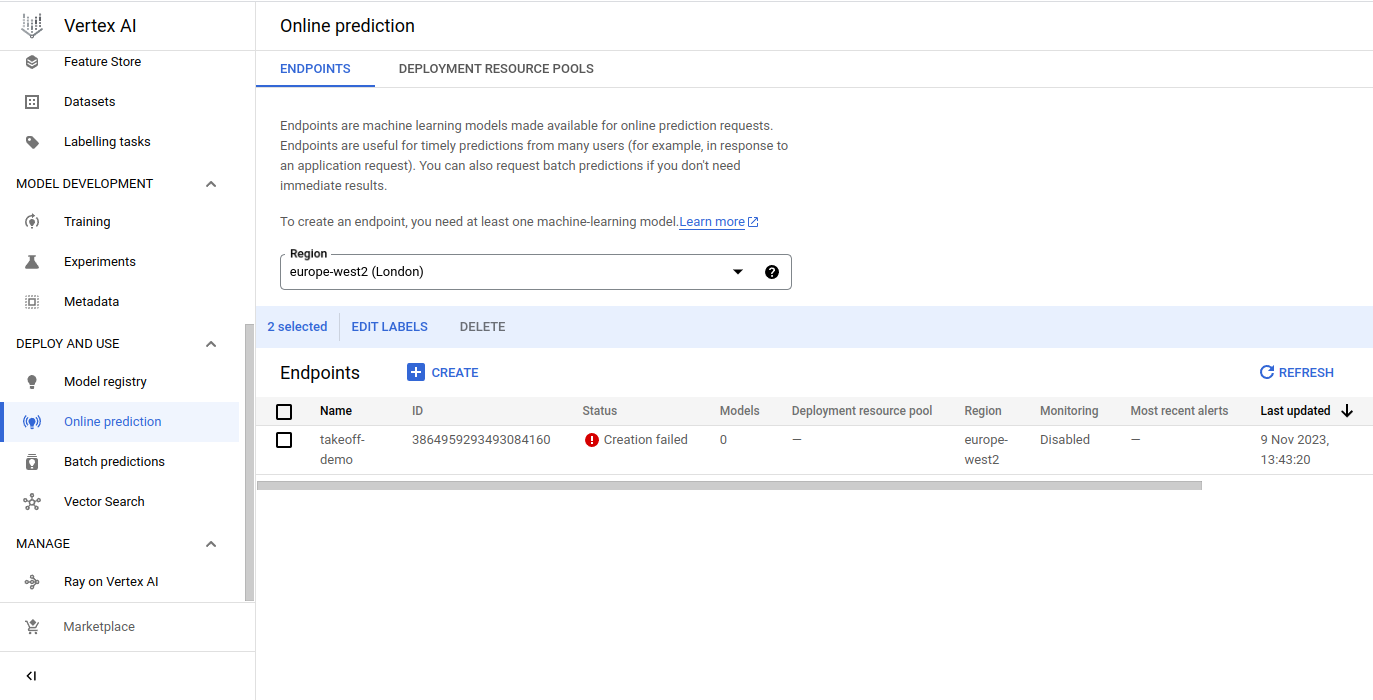
On the left sidebar of the Vertex AI application, click on Online prediction. Then click on Create to bring up a menu on the right side.
Give your endpoint a name and click continue.
Select your model, version and specify your traffic split.
You will then need to select from Machine type to select your desired CPU hardware.
If you're interested in using a GPU for inference, you will need to select from Accelerator type as well, as well as specify your Accelerator Count.
Click through towards the end, adding optional configurations for model monitoring if needed.
By using the Vertex UI, you will have done Step 5 as well, so skip to Step 6.
Python SDK
Open up a python file endpoint.py
Next run the following function to create an endpoint, changing the variables according to your preferences.
# Edit these variables according to your project requirements
PROJECT = "titan-takeoff-server"
ENDPOINT_NAME = "vertex-endpoint"
LOCATION = "europe-west2"

def create_endpoint_sample(
    project: str,
    display_name: str,
    location: str,
):
    aiplatform.init(project=project, location=location)

    endpoint = aiplatform.Endpoint.create(
        display_name=display_name,
        project=project,
        location=location,
    )

    print(endpoint.display_name)
    print(endpoint.resource_name)
    return endpoint

create_endpoint_sample(
    project=PROJECT,
    display_name=ENDPOINT_NAME,
    location=LOCATION,
)
Run this command to create the new endpoint:
python endpoint.py
You will need to save the endpoint ID for the next step.
Step 5: Deploy Model to Endpoint
If you have used the Vertex GUI to create an endpoint, you would have already deployed a model to the same endpoint, so there is no need to do more.
Click here to find out more about the available hardware for inference.
Python SDK
# EDIT THESE VARIABLES TO MATCH YOUR PROJECT
PROJECT = "titan-takeoff-server"
LOCATION = "europe-west2"
MODEL_NAME = "model_id" # You should actually put in the model ID here
MACHINE_TYPE = "n1-standard-2"
ENDPOINT_ID = "endpoint_id"
ACCELERATOR_TYPE = "NVIDIA_TESLA_T4" # GPU selection
ACCELERATOR_COUNT = 1

# Define the function to deploy the model
def deploy_model_with_dedicated_resources_sample(
    project,
    location,
    model_name: str,
    machine_type: str,
    endpoint: Optional[aiplatform.Endpoint] = None,
    deployed_model_display_name: Optional[str] = None,
    traffic_percentage: Optional[int] = 0,
    traffic_split: Optional[Dict[str, int]] = None,
    min_replica_count: int = 1,
    max_replica_count: int = 1,
    accelerator_type: Optional[str] = None,
    accelerator_count: Optional[int] = None,
    sync: bool = True,
):
    """
    model_name: A fully-qualified model resource name or model ID.
          Example: "projects/123/locations/us-central1/models/456" or
          "456" when project and location are initialized or passed.
    """
    print(model_name)

    aiplatform.init(project=project, location=location)

    model = aiplatform.Model(model_name=model_name)

    # The explanation_metadata and explanation_parameters should only be
    # provided for a custom trained model and not an AutoML model.
    model.deploy(
        endpoint=endpoint,
        deployed_model_display_name=deployed_model_display_name,
        traffic_percentage=traffic_percentage,
        traffic_split=traffic_split,
        machine_type=machine_type,
        min_replica_count=min_replica_count,
        max_replica_count=max_replica_count,
        accelerator_type=accelerator_type,
        accelerator_count=accelerator_count,
        sync=sync,
    )

    model.wait()

    return model

# Call the deploy function
deploy_model_with_dedicated_resources_sample(
    project=PROJECT,
    location=LOCATION,
    model_name=MODEL_NAME,
    machine_type=MACHINE_TYPE,
    endpoint=ENDPOINT_ID,
    accelerator_type=ACCELERATOR_TYPE,
    accelerator_count=ACCELERATOR_COUNT,
)
Run this command to deploy the model to the endpoint:
python endpoint.py
If you navigate to the Vertex AI console and click on the Actions button on the right hand side of your endpoint, you can click through to view logs and more details about the configuration.
It can take a while for the endpoint to be available as you have to download a large container and model.
Step 6: Making Requests
Once the model is up and running, we can start to make requests and get back model responses. We are going to make another python file inference.py.
We need the following imports:
from typing import Dict, List, Union

from google.cloud import aiplatform
from google.protobuf import json_format
from google.protobuf.struct_pb2 import Value
Let's write a function that sends a query to the endpoint and receives a response:
# EDIT THESE VARIABLES TO MATCH YOUR PROJECT
PROJECT_ID = "project_id"
ENDPOINT_ID = "endpoint_id"
LOCATION = "europe-west2"
INSTANCES = [{
    "text": "Hello Vertex",
    "max_new_tokens": 20
}]

# Define the predict function
def predict_custom_trained_model_sample(
    project: str,
    endpoint_id: str,
    instances: Union[Dict, List[Dict]],
    location: str = "europe-west2",
    api_endpoint: str = "europe-west2-aiplatform.googleapis.com",
):
    """
    `instances` can be either single instance of type dict or a list
    of instances.
    """
    # The AI Platform services require regional API endpoints.
    client_options = {"api_endpoint": api_endpoint}
    # Initialize client that will be used to create and send requests.
    # This client only needs to be created once, and can be reused for multiple requests.
    client = aiplatform.gapic.PredictionServiceClient(client_options=client_options)
    # The format of each instance should conform to the deployed model's prediction input schema.
    instances = instances if isinstance(instances, list) else [instances]
    instances = [
        json_format.ParseDict(instance_dict, Value()) for instance_dict in instances
    ]

    endpoint = client.endpoint_path(
        project=project, location=location, endpoint=endpoint_id
    )
    response = client.predict(
        endpoint=endpoint, instances=instances
    )
    print(response)
    print(" deployed_model_id:", response.deployed_model_id)
    # The predictions are a google.protobuf.Value representation of the model's predictions.
    predictions = response.predictions
    for prediction in predictions:
        print(" prediction:", dict(prediction))


# Call the predict function
predict_custom_trained_model_sample(
    project= PROJECT_ID,
    endpoint_id=ENDPOINT_ID,
    location=LOCATION,
    instances= INSTANCES,
)
Thats it, now you are ready to use Takeoff alongside a whole host of tools offered in Vertex AI.
Full Code for Deployment
from google.cloud import aiplatform
from typing import Optional, Sequence, Dict

## ----------------------------STEP 1: Create a Model with Takeoff image----------------------------
"""
The first step is to create a model in Vertex AI in the Model Registry.
You will need to specify the Takeoff image, as well as the models you want to use.
"""

# EDIT THESE VARIABLES TO MATCH YOUR PROJECT
VERTEX_MODEL_NAME = "vertex-model" # What you want to call your model in Vertex AI
SERVING_CONTAINER_IMAGE_URI = "europe-west2-docker.pkg.dev/titan-takeoff-server/takeoff-gpu/takeoff-pro@sha256:566d9b8e760e84e1c8f26556d51dbef14a2390e78003994394f59e0bafda355d"
PROJECT = "titan-takeoff-server" # Your GCP project ID
LOCATION = "europe-west2" # The region you want to deploy your model to
TAKEOFF_MODEL_NAME = "facebook/opt-125m" # The name of the Takeoff model you want to use(HuggingFace model hub)
TAKEOFF_DEVICE = "cpu" # The device you want to use for inference (cpu/gpu)


def upload_model_sample(
    project: str,
    location: str,
    display_name: str,
    serving_container_image_uri: str,
    artifact_uri: Optional[str] = None,
    serving_container_predict_route: Optional[str] = None,
    serving_container_health_route: Optional[str] = None,
    description: Optional[str] = None,
    serving_container_command: Optional[Sequence[str]] = None,
    serving_container_args: Optional[Sequence[str]] = None,
    serving_container_environment_variables: Optional[Dict[str, str]] = None,
    serving_container_ports: Optional[Sequence[int]] = None,
    instance_schema_uri: Optional[str] = None,
    parameters_schema_uri: Optional[str] = None,
    prediction_schema_uri: Optional[str] = None,
    sync: bool = True,
):

    aiplatform.init(project=project, location=location)

    model = aiplatform.Model.upload(
        display_name=display_name,
        artifact_uri=artifact_uri,
        serving_container_image_uri=serving_container_image_uri,
        serving_container_predict_route=serving_container_predict_route,
        serving_container_health_route=serving_container_health_route,
        instance_schema_uri=instance_schema_uri,
        parameters_schema_uri=parameters_schema_uri,
        prediction_schema_uri=prediction_schema_uri,
        description=description,
        serving_container_command=serving_container_command,
        serving_container_args=serving_container_args,
        serving_container_environment_variables=serving_container_environment_variables,
        serving_container_ports=serving_container_ports,
        sync=sync,
    )

    model.wait()

    print(model.display_name)
    print(model.resource_name)
    return model

upload_model_sample(
    project=PROJECT,
    location=LOCATION,
    display_name=VERTEX_MODEL_NAME,
    serving_container_image_uri= SERVING_CONTAINER_IMAGE_URI,
    serving_container_environment_variables={
        "TAKEOFF_MODEL_NAME": TAKEOFF_MODEL_NAME,
        "TAKEOFF_DEVICE": TAKEOFF_DEVICE,
        # "TAKEOFF_VERTEX_PORT": TAKEOFF_VERTEX_PORT add if you do not want to use default 3002 port.
    },
    serving_container_health_route="/healthz",
    serving_container_predict_route="/generate_vertex",
    serving_container_ports=[3002], # Or TAKEOFF_VERTEX_PORT if you chose to set it.
)

## ----------------------------STEP 2: Create an endpoint----------------------------
"""
The next step is to create an endpoint in Vertex AI.
This is where you will deploy your model to.
You can create an endpoint with the following code:
"""

# # EDIT THESE VARIABLES TO MATCH YOUR PROJECT
PROJECT = "titan-takeoff-server"
ENDPOINT_NAME = "vertex-endpoint"
LOCATION = "europe-west2"

def create_endpoint_sample(
    project: str,
    display_name: str,
    location: str,
):
    aiplatform.init(project=project, location=location)

    endpoint = aiplatform.Endpoint.create(
        display_name=display_name,
        project=project,
        location=location,
    )

    print(endpoint.display_name)
    print(endpoint.resource_name)
    return endpoint

create_endpoint_sample(
    project=PROJECT,
    display_name=ENDPOINT_NAME,
    location=LOCATION,
)

## ----------------------------STEP 3: Deploy a model to an endpoint----------------------------
"""
The final step is to deploy your model to the endpoint you created.
You can do this with the following code:
"""

# EDIT THESE VARIABLES TO MATCH YOUR PROJECT
PROJECT = "titan-takeoff-server"
LOCATION = "europe-west2"
MODEL_NAME = "model_id" # You should actually put in the model ID here
MACHINE_TYPE = "n1-standard-2"
ENDPOINT_ID = "endpoint_id"
ACCELERATOR_TYPE = "NVIDIA_TESLA_T4" # GPU Selection
ACCELERATOR_COUNT = 1

def deploy_model_with_dedicated_resources_sample(
    project,
    location,
    model_name: str,
    machine_type: str,
    endpoint: Optional[aiplatform.Endpoint] = None,
    deployed_model_display_name: Optional[str] = None,
    traffic_percentage: Optional[int] = 0,
    traffic_split: Optional[Dict[str, int]] = None,
    min_replica_count: int = 1,
    max_replica_count: int = 1,
    accelerator_type: Optional[str] = None,
    accelerator_count: Optional[int] = None,
    sync: bool = True,
):
    """
    model_name: A fully-qualified model resource name or model ID.
          Example: "projects/123/locations/us-central1/models/456" or
          "456" when project and location are initialized or passed.
    """
    print(model_name)

    aiplatform.init(project=project, location=location)

    model = aiplatform.Model(model_name=model_name)

    # The explanation_metadata and explanation_parameters should only be
    # provided for a custom trained model and not an AutoML model.
    model.deploy(
        endpoint=endpoint,
        deployed_model_display_name=deployed_model_display_name,
        traffic_percentage=traffic_percentage,
        traffic_split=traffic_split,
        machine_type=machine_type,
        min_replica_count=min_replica_count,
        max_replica_count=max_replica_count,
        accelerator_type=accelerator_type,
        accelerator_count=accelerator_count,
        sync=sync,
    )

    model.wait()

    return model

deploy_model_with_dedicated_resources_sample(
    project=PROJECT,
    location=LOCATION,
    model_name=MODEL_NAME,
    machine_type=MACHINE_TYPE,
    endpoint=ENDPOINT_ID,
    accelerator_type=ACCELERATOR_TYPE,
    accelerator_count=ACCELERATOR_COUNT,
)
Advanced: Using a Local Model
If you have a transformer model saved locally you can use that but it involves creating a new docker container that contains the model and uploading it to ECR.
We are going to demo this with a small model, facebook/opt-125m.
We are going to assume that we have this model saved in a directory $HOME/models/myopt.
To start, make a new dockerfile in the $HOME directory. We will call it Dockerfile.opt because it is wrapping the opt model.
The dockerfile will look like this:
FROM tytn/takeoff-pro:0.10.2

COPY models/myopt /code/models/hf/myopt
This will copy the model into the directory /code/models/hf/myopt. It is important that this is the exact directory as this is where Takeoff will search for the model.
Then we are going to build this image:
docker build -f Dockerfile.opt -t tytn/takeoff-pro:0.10.2-opt .
Now we proceed from section 2, by tagging the new image and uploading it to ECR.